
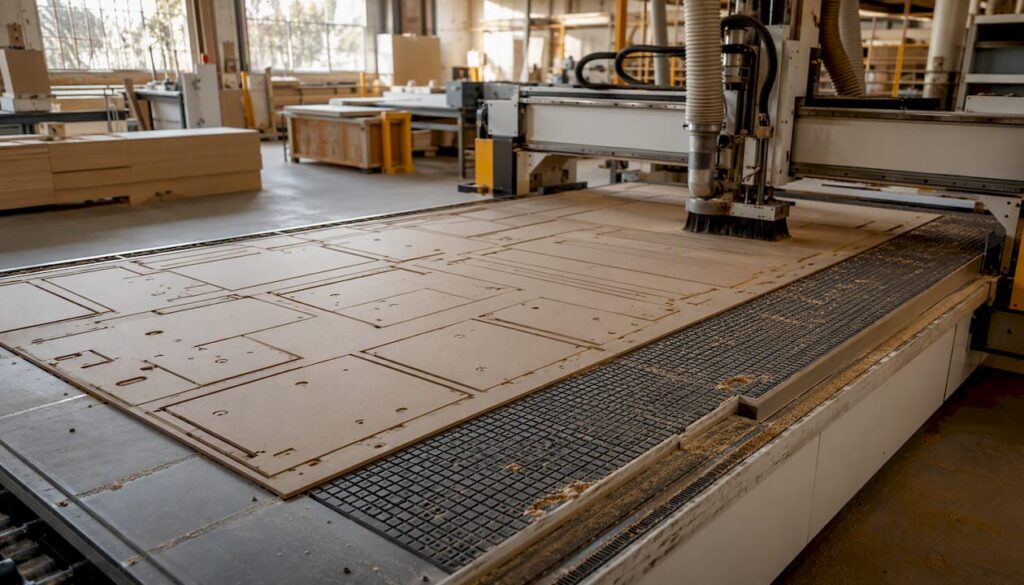
Nested based manufacturing (NBM) is a production method where CNC routing software arranges multiple panel parts onto a full sheet, cuts and machines them in a single pass, and outputs labelled, ready-to-assemble components. For most Australian cabinetry and bespoke furniture shops, the answer is yes: NBM supports a lot-size-one model that lets you shift from batch runs to on-demand production without sacrificing repeatability.
Before you commit, here is the honest short version:
-
Material yield improves because the nesting algorithm packs parts tighter than manual layout, reducing offcut waste on expensive sheet goods.
-
Labour drops as one operator can run a full sheet cycle while the next nest is being prepared, replacing a saw operator, a point-to-point operator, and a manual labeller.
-
Capital and workflow change is real. You are buying a software-plus-workflow transformation, not just a machine. Budget for software licences, post-processor setup, staff retraining, and a pilot period.
-
Quick next step: run a focused pilot on one product family (a standard cabinet carcass range works well) before committing to full production changeover. The implementation section below maps that out step by step.
Key takeaways
Nested based manufacturing delivers its strongest returns when the software integration, vacuum sizing, and operator training are treated as equal priorities to the machine itself.
| Point | Details |
|---|---|
| Software drives success | Post-processor validation and nesting algorithm selection matter more than machine brand alone. |
| Vacuum sizing is critical | Size the pump to your smallest part, not your table area, to prevent part shift and rework. |
| Pilot before full rollout | Run a four-week pilot on one product family with defined yield and cycle-time targets before converting the whole shop. |
| ROI is measurable | Material and labour savings alone can deliver payback in 18–24 months on a mid-range machine investment. |
| Anderson for local support | Anderson’s Genesis PLUS and EXXACT PRO machines are backed by Australian commissioning, training, and service. |
Table of Contents
-
Software and CAD/CAM integration: what to check before you buy
-
How nesting algorithms differ and why it matters for your shop
-
Environmental impact and sustainability in nested based manufacturing
-
Anderson Group Australia: nesting machines, commissioning, and local support
What does nested based manufacturing actually mean?
The industry term is nested-based manufacturing, sometimes shortened to NBM or nesting. Understanding the vocabulary before you talk to a machine supplier saves a lot of confusion.
Short glossary:
-
Nest / nest sheet: a single full-size panel (typically 2400 × 1200 mm or 3050 × 1220 mm) onto which multiple parts have been algorithmically arranged for cutting.
-
Tabs: small uncut bridges of material left by the router to hold parts in place until the sheet is lifted off the table. Tabs are broken or routed away after the cut.
-
Common-line cutting (common-backing): a routing path shared between two adjacent parts, saving one full tool-width of material and reducing cycle time.
-
Lot-size-one: the ability to cut a single unique part or a one-off cabinet order without penalty, because the software re-nests on every job rather than requiring a fixed batch.
NBM suits cabinetry, flat-pack furniture, shelving, door frames, drawer boxes, and any product built from sheet panel. It is less suited to very long structural members (solid timber beams, LVL), parts requiring heavy face machining depth, or components where horizontal boring for dowels dominates the operation. As Cadcode notes, a nesting machine can both cut and machine parts, but certain operations hit practical limits on a standard routing table.
How nesting works from CAD file to finished part
The data flow is linear: CAD design → nesting algorithm → CAM post-processor → G-code → CNC execution → labelled part offload.
Each handoff matters, and a break in any one of them is where shops lose time.
-
CAD output: parts are drawn or generated parametrically (DXF or DWG files are the most common exchange format; some cabinet software outputs directly to a proprietary nesting engine).
-
Nesting algorithm: the software receives a parts list with quantities, dimensions, grain direction constraints, and edge-banding flags. It arranges parts on virtual sheets to maximise yield or minimise cycle time, depending on the optimiser setting.
-
CAM / post-processor: the nested layout is converted to machine-specific G-code (ISO NC format). The post-processor must match your controller; a mismatch here produces incorrect toolpaths or machine faults.
-
CNC execution: the machine reads the G-code, applies the correct tool sequence (compression spiral for through-cuts, V-groove for edge profiles, drill cycles for hardware holes), and runs the sheet.
-
Labelling and kitting: at the end of each sheet, a barcode or QR label is printed for every part. Labels map back to the job order, so downstream assembly staff can sort and kit without reading a drawing.
Automation points worth noting: barcode label printers can be triggered automatically by the nesting software at job-send time; some shops integrate a MES (manufacturing execution system) link so part status updates in real time. Protecting that data flow matters too. When you connect CAD/CAM systems to a network, manufacturing data protection practices become part of the workflow, not an afterthought.
Which shops gain the most from nesting?
The primary gains are material optimisation, labour reduction, and make-to-order responsiveness. Nesting becomes most valuable when raw panel material cost is a significant line item and when your product mix changes frequently enough that fixed tooling setups slow you down.
Concrete benefits for cabinetry shops:
-
Material yield: tighter algorithmic packing consistently outperforms manual sheet layout, particularly on irregular parts like angled end panels or curved door profiles.
-
Reduced handling: parts go from raw sheet to labelled component in one machine cycle, cutting the number of times material is touched before assembly.
-
Fewer setups: one nest sheet replaces multiple saw cuts, drill press operations, and manual marking. A mixed order of 40 different parts can run on two or three sheets.
-
Repeatable tolerances: the CNC cuts to the same dimension every time, which reduces rework on assembly and eliminates the variation that creeps in with manual saw operation.
-
Lot-size-one capability: a single custom cabinet for a bespoke kitchen order costs no more to set up than a run of 20 identical units.
Is nesting a fit for your shop? Run through this quick check:
-
Do you regularly cut more than 10 different part sizes per job?
-
Is sheet material (MDF, melamine, plywood) one of your top three cost lines?
-
Do you lose time resetting a panel saw between orders?
-
Are you quoting custom sizes on a significant portion of jobs?
Three or more yes answers: nesting will likely pay back within a reasonable timeframe. Fewer than two: a panel saw and point-to-point combination may still be the right fit for your volume and mix.
What machine specs actually matter for nesting?
The minimum viable nesting machine for a cabinetry shop needs a table large enough for a full sheet, a vacuum system sized for small parts, and a toolchanger that handles the range of operations in a typical cabinet job. Vacuum pump sizing is the most commonly underestimated factor: small parts require high flow and secure hold-down, and an undersized pump causes part movement during final passes.
| Specification | Typical range for cabinetry nesting |
|---|---|
| Table size | 2500 × 1250 mm to 3100 × 1600 mm |
| Vacuum pump capacity | 250–600 m³/h (flow-through spoilboard type) |
| Spindle power | 9–18 kW (HF spindle, ISO 30 or HSK-F63 taper) |
| Toolchanger positions | 8–24 positions (linear or carousel) |
| Axis travel speed | 40–80 m/min (rapid) |
Beyond the machine itself, shop readiness matters just as much:
-
Dust extraction: nesting produces a high volume of fine MDF dust. A dedicated extraction unit rated for the spindle power is non-negotiable.
-
Material handling: a sheet-loading trolley or vacuum lifter reduces operator fatigue and speeds sheet changeover.
-
Spoilboard management: a phenolic or MDF spoilboard must be surfaced regularly to maintain consistent vacuum seal across the full table.
-
Labelling system: a barcode printer and label applicator station positioned at the machine offload end keeps parts traceable from the moment they leave the table.
Software and CAD/CAM integration: what to check before you buy
Success with NBM depends more on software and workflow integration than on any single machine. The machine is the easy part. The hard part is getting your design data, nesting engine, post-processor, and controller talking to each other without manual re-entry at each step.
What to check in a nesting software package:
-
Algorithm quality: does the optimiser offer both yield-maximising and cycle-time-balancing modes? Can you set grain direction locks and edge-banding flags per part?
-
Parametric libraries: can you build a cabinet family once and drive all part sizes from a single parameter set? This is where shops recover the most time on repeat product lines.
-
Post-processor support: does the software ship with a validated post-processor for your target controller (Siemens, Fanuc, Syntec, or proprietary)? A generic post is a risk.
-
Barcode and MES links: can the software output a CSV parts list and trigger label printing automatically? Manual label entry defeats the purpose.
-
File format compatibility: confirm DXF/DWG import, and check whether the software accepts direct output from your CAD package without a conversion step.
Two software packages dominate the Australian cabinetry market. Mozaik is a purpose-built cabinet and nesting package with a dedicated optimiser that lets you choose between yield and cycle-time objectives. Cabinet Vision is a parametric cabinet design tool with integrated nesting and post-processor output; it suits shops that want design-to-machine in one environment. Both integrate with common CNC controllers, but post-processor validation against your specific machine model is essential before going live.
Pro Tip: Ask any software vendor for a validated post-processor file for your exact machine model and controller version before signing a licence agreement. “Compatible” and “validated” are not the same thing.
When you connect nesting software to a network for MES or cloud backup, IT compliance for connected manufacturing systems becomes relevant, particularly around file access controls and audit trails for job data.
Practical nesting tactics that improve yield and cut time
Choose a nesting strategy that fits your primary objective: maximise yield, minimise cycle time, or simplify downstream processes. You rarely optimise all three simultaneously, so know which one matters most before you configure the optimiser.
Tabs and hold-down:
-
Use tabs on parts smaller than 150 × 150 mm. Without them, small parts lift on the final pass and the router destroys them.
-
Place tabs on the edge-banding face last, or on a face that will be hidden in assembly, so tab break-off marks are not visible.
-
For very small parts (drawer knob blanks, shelf pin strips), group them into a sub-nest within the sheet and cut them last, after larger parts have been removed and the vacuum seal is strongest.
Common-line cutting:
- Apply common-line paths between rectangular parts of the same thickness to save one tool-width of material per shared edge. On a 3.2 mm compression bit, that is 3.2 mm per pair of parts, which adds up across a full sheet of carcass sides.
Part orientation for edge banding:
- Orient parts so the longest edge-banded edge runs parallel to the X-axis. This simplifies downstream edge-banding machine feeding and reduces the number of panel rotations on the bander.
Label placement:
- Set label output to the top-left corner of each part in the nest. When parts are lifted and stacked, labels remain visible and scannable without flipping panels.
Mini case examples:
-
Cabinet door run: nest doors grain-up, with a 5 mm gap between parts for the compression spiral. Use no tabs (doors are large enough for vacuum hold-down alone). Output labels to a printer at job-send.
-
Shelf pack: apply common-line cutting between identical shelf widths. Group by length to minimise sheet changes.
-
Small accessory run (drawer bases, small fillers): group all small parts into one sheet, use tabs on every part, and cut this sheet last in the job sequence when the spoilboard is freshest.
How to roll out nesting without disrupting production
Run a focused pilot on a single product family with clear, pre-agreed success metrics. Trying to convert the whole shop at once is the fastest way to create chaos and lose confidence in the process.
Pilot plan steps:
-
Select one SKU family (e.g. a standard 600 mm base cabinet range in three heights).
-
Define baseline metrics before the pilot starts: current material yield per sheet, parts produced per hour, and rework rate.
-
Set target improvements: material yield, cycle time per sheet, and percent rework.
-
Run staff training on the nesting software and machine operation. Allow two to three weeks for operators to reach consistent output.
-
Run the pilot for four weeks minimum before evaluating results.
-
Document every deviation: part shifts, label failures, software errors. These become your troubleshooting checklist.
| Metric | How to measure | Suggested target range |
|---|---|---|
| Material yield | Usable parts area ÷ total sheet area | 85–92% |
| Parts per hour | Total parts cut ÷ machine hours | Baseline + 20–35% |
| Rework rate | Rejected parts ÷ total parts | Below 2% |
| Label accuracy | Correctly labelled parts ÷ total parts | Above 90% |
| Sheet changeover time | Time from last part offload to first cut on next sheet | Under 4 minutes |
ROI estimation for an Australian cabinetry shop
ROI is driven mostly by labour savings, material yield improvement, and increased throughput. Here is a worked example in AUD for a mid-size shop running 20 sheets per day.
-
Material saving: assume current yield is 78% and nesting improves it to 88%. On 20 sheets of 18 mm melamine at $85 per sheet, that is a saving of roughly $170 per day, or around $42,500 per year (250 working days).
-
Labour saving: replacing a panel saw operator and a point-to-point operator with one nesting machine operator saves approximately $60,000–$80,000 per year in wages (based on Australian manufacturing award rates).
-
Throughput gain: if the nesting machine processes 20% more parts per shift than the previous workflow, and each additional cabinet generates $150 gross margin, 10 extra cabinets per day adds $375,000 per year in revenue capacity.
-
Machine and software cost: a production-grade nesting CNC with software and installation typically falls in the $150,000–$350,000 AUD range depending on table size, spindle power, and toolchanger configuration.
-
Simple payback: combining material and labour savings alone ($100,000–$120,000 per year), payback on a $200,000 machine investment is roughly 18–24 months before throughput gains are counted.
Sensitivity notes: vacuum pump quality shifts the rework rate significantly.
Common pitfalls and how to fix them
The most common failures in a nesting rollout are vacuum and hold-down problems, tooling or specification mismatches, and insufficient post-processor support. Most are avoidable with the right pre-commissioning checklist.
Part shifting during cuts:
-
Cause: undersized vacuum pump or a spoilboard that has lost its porosity.
-
Fix: surface the spoilboard, check pump flow rate against the manufacturer’s minimum for your table size, and add tabs to any part under 200 mm in either dimension.
Poor edge finish:
-
Cause: incorrect tool selection (upcut spiral instead of compression spiral) or feed rate too high for the material density.
-
Fix: use a compression spiral for through-cuts in melamine and MDF. Set feed rate to the tool manufacturer’s recommendation for the specific material and thickness.
Barcode and labelling failures:
-
Cause: label printer not triggered by the nesting software, or CSV parts list format mismatch.
-
Fix: validate the software-to-printer link during commissioning, not after go-live. Test with 10 sheets before running production.
Horizontal boring inefficiency:
Forum practitioners consistently report that horizontal boring for dowels or cam-lock hardware is better handled on a dedicated horizontal borer rather than forced through the nesting router. A standard vertical spindle on a nesting machine cannot reach horizontal faces without an aggregate head, and aggregate heads add cycle time and tool-change complexity. If your product relies heavily on dowel joinery, budget for a dedicated borer alongside the nesting machine.
Small-part handling:
- Group small parts into a dedicated zone on the sheet and cut them last. Use tabs, and consider a vacuum fixture or custom spoilboard insert for very small components.
Anderson Group Australia and nesting for cabinetry shops
Anderson Group Australia supplies CNC machinery, servicing and spare parts. Confirm the exact machine configuration, installation arrangements and available support with the team.
The Genesis PLUS is Anderson’s dedicated nesting CNC, built for panel processing in cabinetry and furniture production.
| Specification | Genesis PLUS |
|---|---|
| Table size | 2500 × 1250 mm (standard) |
| Vacuum system | High-flow spoilboard vacuum, zone-selectable |
| Spindle power | 12 kW HF spindle |
| Toolchanger | 12-position automatic toolchanger |
| Controller | Syntec (with validated post-processor support for Mozaik and Cabinet Vision) |
For shops with higher throughput requirements or more complex part geometries, the EXXACT PRO 4-Axis CNC Router adds a fourth axis and extended toolchanger capacity, suited to shops running mixed panel and solid timber work.
Deployment and support:
-
Site assessment to confirm table size, vacuum sizing, and dust extraction requirements before purchase.
-
Factory commissioning with validated post-processor setup for your chosen nesting software.
-
Operator training programme covering nesting software, machine operation, spoilboard maintenance, and label system setup.
-
Spare parts held locally in Australia, with service agreements available for scheduled maintenance and emergency callouts.
-
Anderson’s machine guides and blog carry practical commissioning and implementation advice relevant to Australian shop conditions.
How nesting algorithms differ and why it matters for your shop
Commercial nesting optimisers offer different algorithmic objectives: some maximise material yield, others balance yield with machine cycle time, and some prioritise ease of downstream processing. Choosing the wrong objective for your shop’s primary KPI is a common and costly mistake.
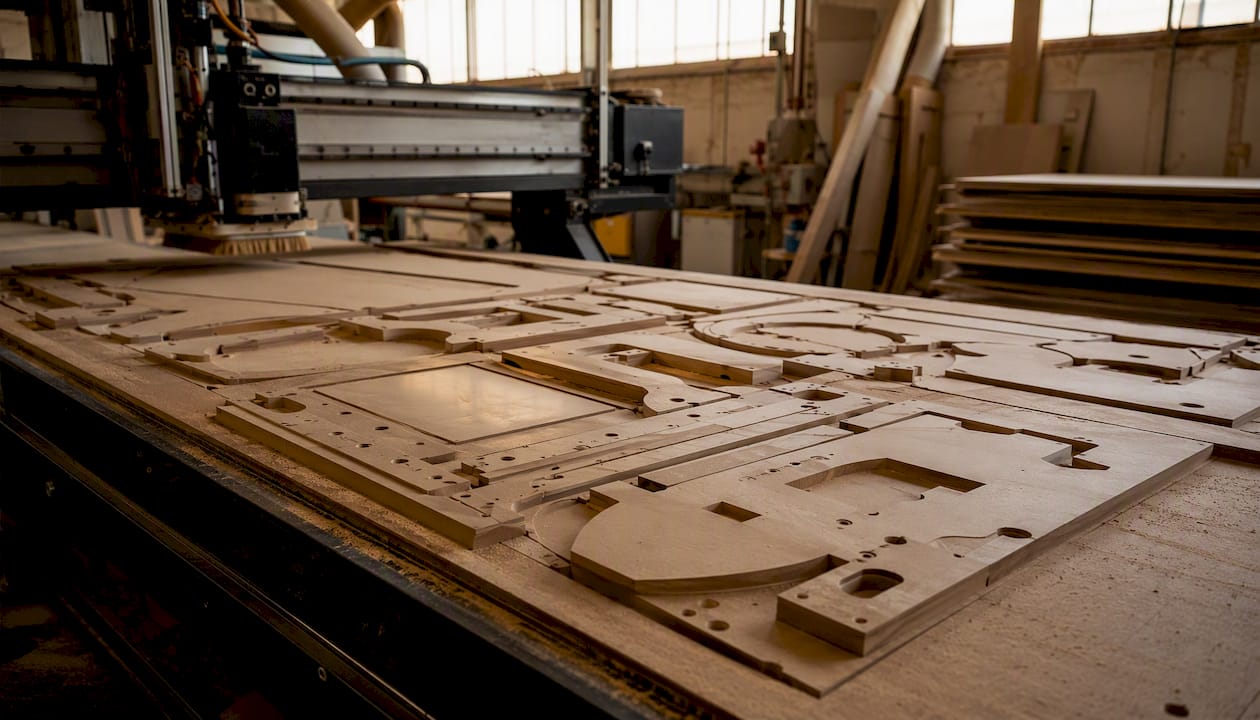
Yield-maximising algorithms pack parts as tightly as possible, rotating and mirroring parts to fill every gap. They produce the lowest offcut percentage but often generate complex, non-sequential toolpaths that increase cycle time and make part identification harder during offload.
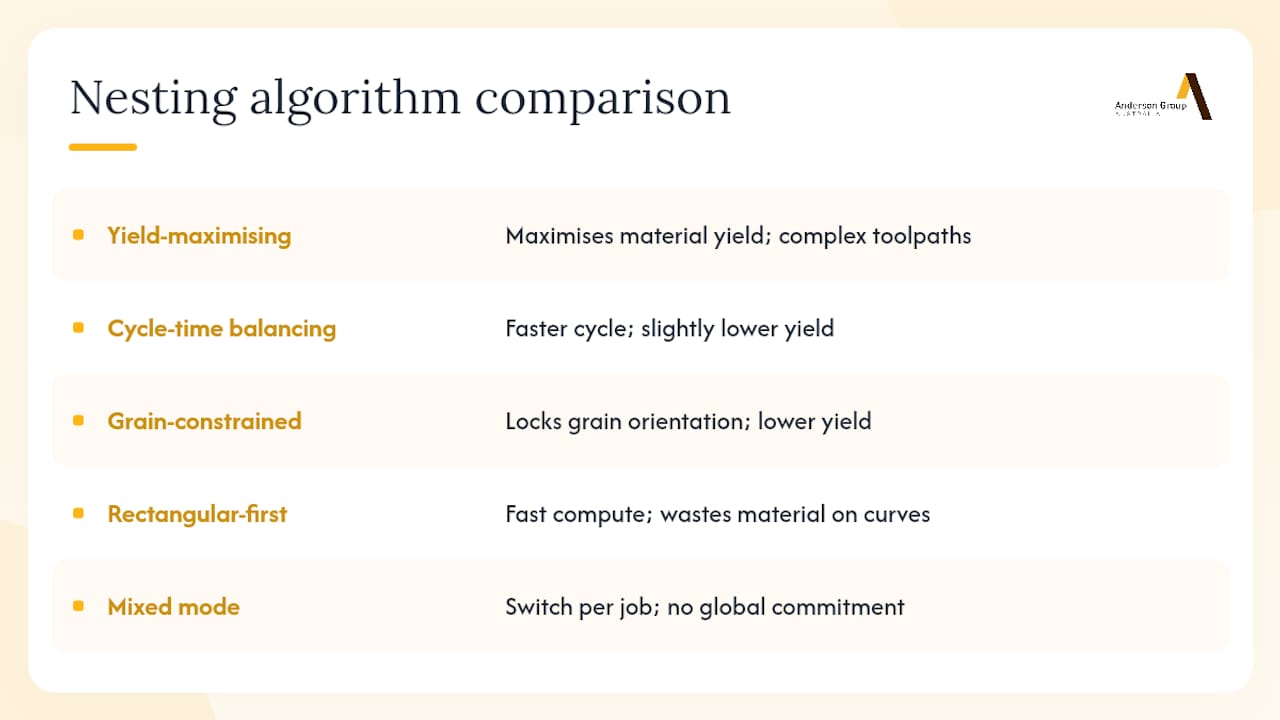
Cycle-time-balancing algorithms accept slightly lower yield in exchange for simpler, more linear toolpaths. The machine finishes each sheet faster, which matters when throughput (sheets per shift) is the bottleneck rather than material cost.
Grain-constrained algorithms lock part orientation to honour timber grain or decorative panel face direction. Yield drops compared with unconstrained nesting, but the parts are usable. Skipping grain constraints to chase yield produces parts that fail quality inspection.
Rectangular-first algorithms are a subset used in some entry-level software. They treat all parts as bounding rectangles rather than true profiles, which is fast to compute but wastes material on any part with a non-rectangular profile (angled panels, curved doors).
The practical takeaway: if material cost is your primary pressure, choose a yield-maximising optimiser and accept the longer cycle time. If throughput is the constraint, use a cycle-time-balancing mode and recover material cost through volume. Most production-grade packages, including Mozaik, let you switch between objectives per job rather than committing to one globally.
Environmental impact and sustainability in nested based manufacturing
NBM reduces raw material consumption directly, and that reduction flows through to lower embodied carbon in finished products. Tighter sheet utilisation means fewer panels purchased, fewer panels transported, and less offcut material sent to landfill or biomass.
For Australian manufacturers, this matters beyond cost. The National Packaging Targets and broader circular economy policy direction are pushing manufacturers to document and reduce material waste. NBM gives you a measurable, auditable yield figure per job, which is far easier to report than estimating waste from manual saw operations.
MDF and melamine offcuts from nesting are typically fine-dust and small strips, which are harder to recycle than large panel offcuts from a panel saw. Some shops route offcuts to a biomass boiler for heating; others work with panel board recyclers. The key sustainability gain from nesting is prevention: less offcut generated in the first place, rather than better offcut disposal.
Energy consumption is another consideration. A nesting CNC with a 12–18 kW spindle and a high-flow vacuum pump draws significant power per shift. However, replacing two or three separate machines (panel saw, drill press, point-to-point) with one nesting cell often reduces total installed power draw and simplifies energy monitoring. Shops pursuing ISO 14001 certification or preparing for scope 3 emissions reporting will find that a single nesting cell is easier to meter and report than a multi-machine workflow.
Pro Tip: Track material yield per job in your nesting software from day one. That data becomes your baseline for sustainability reporting and your strongest argument for capital reinvestment when yield improvements are visible over time.
What experience with NBM rollouts actually shows
The shops that get the most from nested based manufacturing are not always the ones with the biggest machines or the most expensive software. They are the ones that treat the transition as a process redesign, not a machine swap.
The pattern that comes up repeatedly: a shop invests in a capable nesting CNC, runs it with the same workflow assumptions as the old panel saw, and then wonders why yield and throughput gains are modest. The machine is not the constraint. The constraint is almost always the software integration, the post-processor validation, or the operator’s confidence with the nesting engine.
Vacuum sizing is the other underestimated factor. Shops that size the vacuum pump to the table area rather than to the smallest part they will cut end up with part-shift problems that erode trust in the whole system. The fix is straightforward, but it requires knowing the problem before you specify the machine, not after.
My recommendation for any shop considering a pilot: define your success metrics before the machine arrives, validate the post-processor on your actual job files before go-live, and give operators three to four weeks of dedicated training time rather than squeezing it into production. The payback timeline is real, but it assumes the workflow is set up correctly from the start.
Anderson Group Australia: nesting machines, commissioning, and local support
Discuss the Genesis PLUS against your cabinet-production requirements, including software, post-processing, workholding and handling. Confirm site assessment, training and support items in the proposal.
For a nesting CNC purchase, agree commissioning, operator training, spare-parts availability and the support scope with the supplier. Confirm delivery and response arrangements in writing for the selected machine. Production readiness and downtime depend on installation, the fault, parts and service arrangements; no standard recovery time is established here.
To request a demonstration or speak with a local specialist about your shop’s nesting requirements, contact Anderson directly at Andersonaustralia.
Sources
The following sources are worth bookmarking depending on where you are in your evaluation: